Linksys RT31P2 BYOD VoIP Settings & Configuration Guide
The RT31P2 with 2 Phone Ports is a kind of "splitter" for your Internet connection. Just connect your DSL or Cable Modem to the Router, and all the computers in your home or office can share the Internet - all at the same time. The built-in 3-port switch lets you attach 3 local PCs directly, or daisy-chain out to more hubs and switches as your network grows.
The two standard telephone jacks on the Router enable our high-quality feature-rich telephone service through your high-speed connection even while you're surfing the Internet. Each phone jack operates independently -- like having two phone lines.
STEP 1
Connect the ethernet cable from your PC to the LAN port of the router. Then connect your cable or DSL modem's ethernet cable to the router's Internet port. If necessary, disconnect the RJ-11 telephone cable of your telephone from the telephone wall jack. Then connect that end to the router's phone 1 port. If you have a second telephone plug that into phone 2 port. Now, power up your PC, cable and DSL modem and your router.
STEP 2
You will need the setup instructions provided by your Internet Service Provider (ISP). If you do not have this information, then contact your ISP before continuing.
The instructions from your ISP tell you how to setup your PC for Internet access. Because you are now using the router to share Internet access among several computers, you will use the setup information to configure the router instead.
STEP 3
Make sure that your PC's ethernet adapter is set to 'Obtain an IP Address Automatically'
Open your browser and enter 192.168.15.1 . enter "admin" for username and "admin" for password.
STEP 3
Next, choose from the main menu 'Voice' and then Line1 .
You need to modify only a few parameters from the factory default. They are listed here:
Proxy: sip.ABC-VoIP.com
Display Name: Enter your full name, this will show up as part of your caller ID.
User ID: Enter the account number (ex.: 5551231234) assigned to you when signed up for ABC-VoIP service.
Password: Enter the password that you chose when you signed up for the service.

STEP 7
Change the “Preferred Codec” to G729.

STEP 8
Click on the "Save Settings " button at the bottom of the form.
STEP 9
Make Calls!
Problems?
If you get one-way audio, or cannot get a dial tone or cannot make/receive calls with your VoIP device, you are probably behind firewall. Your router's firewall (also known as NAT) is blocking certain operations of the VoIP telephone adapter or some of the settings of the adapter is not entered correctly.
NAT/Firewall Issues
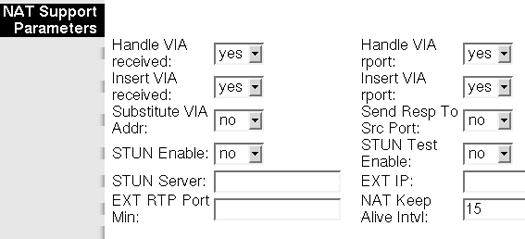
If you get one-way audio, you are probably behind NAT. Make the following changes on LINE 1 (you have to click on advanced view to see these options)

on the SIP menu;

If the phone fails to login, please take the time to double check your configuration as above. If everything appears to be correct, the problem may be your firewall.
